

Quantum Computing
An overview of Quantum Software Platforms
Introduction
Quantum programming languages were first conceived at least two decades ago, but those languages were largely theoretical and without hardware.
Quantum computers are now a reality, and there are real quantum programming languages that allow anyone with internet access to use them. A critical mass of effort from researchers in industry and academia alike has produced small quantum devices that operate on the circuit model of quantum computing.
These computers are small, noisy, and not nearly as powerful as the current classical computers. But they are nascent, steadily growing and heralding a future of unimaginably large computational power to resolve problems in chemistry, machine learning, optimization, finance and more. These devices are a testbed for preparing the next generation of quantum software engineers to tackle current classically intractable computational problems. In fact, cloud quantum computing has already been used to calculate deuteron binding energy and to test subroutines in machine learning algorithms.
Recently, there has been an explosion of quantum computing software over a wide range of classical computing languages. You can find a list of open-source projects and a list of quantum computer simulators on the web. This sheer number of programs, while positively reflecting the growth of the field, makes it difficult for students and researchers to decide on which software package to use, as they often get lost in documentation or are too overwhelmed to know where to start.
In this overview, I’d like to introduce you to four main projects: three of these projects make the connection to a real quantum computer in the cloud possibile (Qiskit by IBM, pyQuil by Rigetti Computing and ProjectQ by ETH Zürich) while the last, the Quantum Development Kit by Microsoft, is only a simulator (at present Microsoft still doesn’t have real quantum hardware).
The ability to connect to a real quantum device has guided my choice of these platforms. But, there are many other reliable projects, among which I would like to mention the Quantum Inspire project by QuTech (in Delft) that I recommend to you.
Software platforms
An overview of various quantum computers and the software needed to connect to them is shown in the following picture:

At the moment there are four software platforms that allow you to connect to three different computer quantum, freely accessible:
- an 8 qubits quantum computer by Rigetti Computing – accessible through pyQuil
- a 5 qubits quantum computer by IBM – accessible through Qiskit and ProjectQ
- a 16 qubits quantum computer by IBM – accessible through Qiskit and ProjectQ
There is also a fourth 20 qubit quantum computer by IBM, but this device is only available to members of the IBM Q Network, a collection of companies, universities, and national laboratories interested in and investing in quantum computing.
IBM has also a 50 qubits prototype quantum computer, not yet available in the cloud service. To complete the overview, we have to mention Google with a 72 qubits prototype quantum processor (Bristlecone) and Intel (with its partner QuTech) with a 49 qubits quantum processor (Tangle Lake).
The technology of quantum hardware is rapidly changing. It is very likely that new computers will be available by the end of the year, and in two or three years this list may be completely outdated. What will remain, however, is the software used for connecting to this technology. It will be very simple to use these new quantum computers by changing just a few lines of code without changing the actual syntax used for generating or running the quantum circuit.
For example, in QISKit, one would just need to change the name of the backend when executing the circuit:
execute(quantum.circuit, backend=”name”, …..)
Although the software is changing as well with new version releases, these are, for the most part, relatively minor syntactical changes that do not alter significantly the software functionality.
In the next sections, we will explore the different software platforms, discussing requirements and installation, documentation and tutorials, language syntax, quantum language, quantum hardware, and simulator capabilities. Our discussion is not meant to serve as complete instruction in a language, but rather to give the reader a feel of each platform before diving into one (or more) of his/her choosing.
pyQuil
pyQuil is an open-source Python library developed by Rigetti Computing for constructing, analyzing, and running quantum programs. It is built on top of Quil, an open quantum instruction language (or simply quantum language), designed specifically for near-term quantum computers and based on a shared classical/quantum memory model (meaning that both qubits and classical bits are available for memory). pyQuil is one of, and the main, developer libraries in Forest, which is the overarching platform for all of Rigetti’s quantum software.
To install and use pyQuil, Python 2 or 3 is required, though Python 3 is strongly recommended as future feature developments may only support Python 3. The easiest way to install pyQuil is using the Python package manager pip:
pip install pyquil
pyQuil has excellent documentation hosted online with background information in quantum computing, instructions on installation, basic programs and gate operations, the simulator known as the quantum virtual machine (QVM), the actual quantum computer, and the Quil language and compiler.
The syntax of pyQuil is very clean and efficient. The main element for writing quantum circuits is Program and can be imported from pyquil.quil. Gate operations can be found in pyquil.gates. The api module allows one to run quantum circuits on the virtual machine. One nice feature of pyQuil is that qubit registers and classical registers do not need to be defined a priori but can be rather allocated dynamically. Qubits in the qubit register are referred to by index (0, 1, 2, …) and similarly for bits in the classical register.
A random generator circuit can thus be written as follows:
# random number generator circuit in pyQuil
from pyquil.quil import Program
import pyquil.gates as gates
from pyquil import api
qprog = Program( )
qprog += [gates.H(0),
gates.MEASURE(0,0)]
qvm = api.QVMConnection( )
print(qvm.run(qprog))
In the first three lines, we import the bare minimum needed to declare a quantum circuit/program (line 2), to perform gate operations on qubits (line 3), and to execute the circuit (line 4). In line 6 we instantiate a quantum program, and in lines 7-8 we give it a list of instructions: first do the Hadamard gate H to the qubit indexed by 0, then measure the same qubit into a classical bit indexed by 0.
In line 10 we establish a connection to the QVM, and in line 11 we run and display the output of our circuit. This program prints out, as is standard for pyQuil output, a list of lists of integers: in our case, either [[0]] or [[1]]. In general, the number of elements in the outer list is the number of trials performed. The integers in the inner lists are the final measurements into the classical register. Since we only did one trial (this is specified as an argument to api.QVMConnection.run, which is set as default to one), we only get one inner list. Since we only had one bit in the classical register, we only get one integer.
You can read how to setup a different number of trials in the documentation.
As we mention above, Quil is the quantum instruction language, or simply quantum language, that feeds quantum computers instructions. It is analogous to assembly language on classical computers. The general syntax of Quil is GATE index where GATE is the quantum gate to be applied to the qubit indexed by index (0, 1, 2, …).
pyQuil has a feature for generating Quil code from a given program. For instance, in the above quantum random number generator, we could add the line:
print(qprog)
at the end to produce the Quil code for the circuit, which is shown below:
H 0
MEASURE 0 [0]
Rigetti Computing has a quantum processor that can be used by those who request access. To request access, one must visit the Rigetti website and provide a full name, email address, organization name, and description of the reason for QPU access. Once this is done, a company representative will reach out via email to schedule a time to grant the user QPU access.
Otherwise you can use the simulator (QVM) to execute a quantum program. You can download the simulator following the instructions on the website. You can also request the access to the simulator in the cloud service by Rigetti.
Qiskit
The Quantum Information Science Kit, or Qiskit, is a full-stack quantum software development platform that you can use with IBM Q Experience.
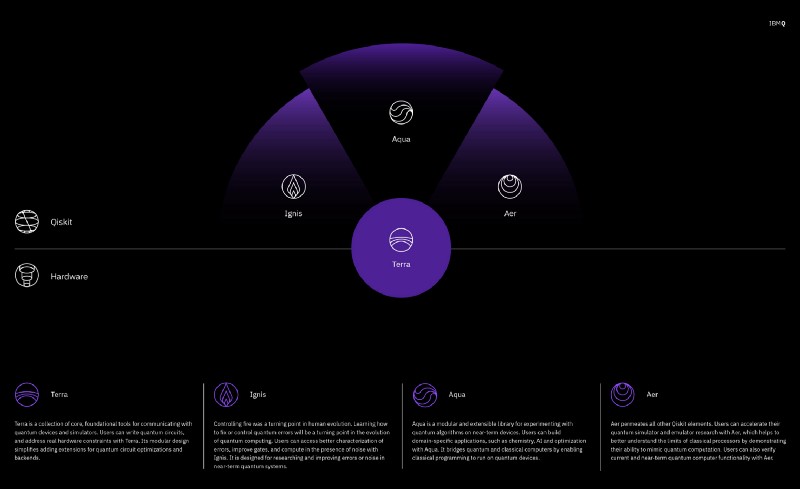
Qiskit Terra is the foundation on which the rest of the software lies. Terra provides a bedrock for composing quantum programs at the level of circuits and pulses, to optimize them for the constraints of a particular device, and to manage the execution of batches of experiments on remote-access devices
Built on top of Qiskit Terra, there are other three frameworks:
- Qiskit Aqua: Aqua is where algorithms for NISQ, noisy intermediate-scale quantum computers, are built. These algorithms can be used to build applications for quantum computing. Aqua is accessible to domain experts in chemistry, optimization or AI, who want to explore the benefits of using quantum computers as accelerators for specific computational tasks, without needing to worry about how to translate the problem into the language of quantum machines
- Qiskit Ignis:Ignis is dedicated to fighting noise and errors and to forging a new path. This includes better characterization of errors, improving gates, and computing in the presence of noise. Ignis is meant for those who want to design quantum error correction codes, or who wish to study ways to characterize errors through methods such as tomography
- Qiskit Aer: Aer permeates all Qiskit elements. To really speed up development of quantum computers we need better simulators, emulators and debuggers. Aer will help the researchers understand the limits of classical processors by demonstrating to what extent they can mimic quantum computation. Furthermore, we can use Aer to verify that current and near-future quantum computers function correctly.
dotQuantum.io | The Qiskit elements
In this overview, our focus is in Qiskit Terra, an open-source SDK (Software Development Kit) to work with the quantum language OpenQASM and with the IBM Quantum Experience. Qiskit Terra is available in Python, JavaScript and Swift. For beginners, Python is a very good starter programming language because of its easy and intuitive syntax.
QISKit is available on macOS, Windows, and Linux. To install QISKit, Python 3.5+ is required. Additional helpful, but not required, components are Jupyter notebooks for tutorials and the Anaconda 3 Python distribution, which comes with all the necessary dependencies pre-installed.
The easiest way to install QISKit is by using the Python package manager pip. At a command line, we install the software by typing:
pip install qiskit
Note that pip automatically handles all dependencies and will always install the latest version. Users who may be interested in contributing to QISKit can install the source code by cloning from GitHub.
The documentation of Qiskit Terra can be found online at https://qiskit.org/documentation/. This contains instructions on installation and setup, example programs and connecting to real quantum devices, project organization, Qiskit overview, and developer documentation.
Background information on quantum computing can also be found for users who are new to the field. A very nice resource is the SDK reference where users can find information on the source code documentation.
Qiskit also contains a large number of tutorial notebooks. These include entangled states; standard algorithms like Deutsch-Josza, Grover’s algorithm, phase estimation, and the quantum Fourier transform; more advanced algorithms like the variational quantum eigensolver and applications to fermionic Hamiltonians; and even some fun games like quantum battleships.
In IBM Quantum Experience, you can also use the Composer, where the user can easily create quantum circuits, before starting using Qiskit-Terra.
The syntax for Qiskit can be seen in the following example program. In contrast to pyQuil, one has to explicitly allocate quantum and classical registers. We show below the program for the random number circuit in Qiskit:
# random number generator circuit in QISKit
from qiskit import QuantumRegister, ClassicalRegister, QuantumCircuit, execute
qreg = QuantumRegister(1)
creg = ClassicalRegister(1)
qcircuit = QuantumCircuit(qreg,creg)
qcircuit.h(qreg[0])
qcircuit.measure(qreg[0],creg[0])
result = execute(qcircuit, 'local_qasm_simulator’).result()
print(result.get_counts())
In line 2 we import the tools to create quantum and classical registers, a quantum circuit, and a function to execute that circuit. We then create a quantum register with one qubit (line 4), classical register with one bit (line 5), and a quantum circuit with both of these registers (line 6).
Now that we have a circuit created, we begin providing instructions: in line 8, we do a Hadamard gate to the zeroth qubit in our quantum register (which is the only qubit in the quantum register); in line 9, we measure this qubit into the classical bit indexed by zero in our classical register (which is the only bit in the classical register). Now that we have built a quantum circuit, we execute it in line 11 and print out the result in line 12.
By printing result.get counts(), we print the “counts” of the circuit, that is, a dictionary of outputs and how many times we received each output.
For our case, the only possible outputs are 0 or 1, and a sample output of the above program is {‘0’: 532, ‘1’: 492}, indicating that we got 532 instances of 0 and 492 instances of 1. (The default number of times to run the circuit, called shots in Qiskit, is 1024.)
OpenQASM (open quantum assembly language, which we may refer to simply as QASM) is the quantum language that provides instruction to the actual quantum devices, analogous to assembly language on classical computers. The general syntax of QASM is gate qubit where gate specifies a quantum gate operation and qubit labels a qubit. Qiskit has a feature for generating QASM code from a circuit.
In the above random number circuit example, we could add the line:
print(qcircuit.qasm())
at the end to produce the QASM code for the circuit, shown below:
OPENQASM 2.0;
include "qelib1.inc";
qreg q0[1];
creg c0[1];
h q0[0];
measure q0[0] -> c0[0];
The first two lines are included in every QASM file. Line 3 and 4, creates a quantum (classical) register, and lines 5 and 6 give the instructions for the circuit. It is possible to write small circuits like this directly in OpenQASM, but for larger circuits it is nice to have the tools in Qiskit to cleanly and efficiently program quantum computers.
There is a vast amount of documentation for the quantum backends supported by Qiskit to use the real hardware to run quantum programs.
You can use a real quantum processor through IBM Q Experience (QX) cloud platform and now you have two different choices:
How to setup the code to run the quantum program on the real hardware and other informations are available in the documentation.
IBM provides also many simulators to run quantum programs locally or in the cloud service.
ProjectQ
ProjectQ is an open source software framework for quantum computing featuring connectivity to IBM’s quantum backends, a high performance quantum computer simulator, and several library plug-ins. The first release of ProjectQ was developed by Thomas Häner and Damien S. Steiger in the group of Matthias Troyer at ETH Zürich, and it has since picked up more contributors.
A current version of Python, either 2.7 or 3.4+, is required to install ProjectQ. The documentation contains detailed information on installation for each operating system. At a command line, we install the software by typing:
python -m pip install --user projectq
You can take a look at the online tutorials and quantum program examples (random number generators, teleportation and Shor’s algorithm).
The syntax of ProjectQ is clear and efficient, though it may take some getting used to. There is no quantum assembly language for ProjectQ (because there is no ProjectQ specific quantum backend), but the classical language is sort of a hybrid classical/quantum language.
To elaborate, an example program to produce a random bit is shown below:
from projectq import MainEngine # import the main compiler engine
from projectq.ops import H, Measure # import the operations we want to perform (Hadamard and measurement)
eng = MainEngine() # create a default compiler (the back-end is a simulator)
qubit = eng.allocate_qubit() # allocate 1 qubit
H | qubit # apply a Hadamard gate
Measure | qubit # measure the qubit
eng.flush() # flush all gates (and execute measurements)
print(“Measured {}“.format(int(qubit))) # output measurement result
In line 2, we import the necessary module to make a quantum circuit, and in line 3 we import gate operations. In line 5 we allocate and engine from the MainEngine, and in line 6 we allocate a one qubit register. In lines 8 and 9 we provide the circuit instructions: first do a Hadamard gate on the qubit in the register indexed with a 0, then measure this qubit. This is where the “quantum syntax” appears within the classically scripted language. The general formulation is operation | qubit with the vertical line between the two resemblant of Dirac notation, H|0>, for example. We then flush the engine which pushes it to a backend and ensures it gets evaluated/simulated. Unlike pyQuil and Qiskit, in ProjectQ one does not specify a classical register when making a measurement. Instead, when we measure qbits[0] in line 9, we get it’s value by converting it to an int when we print it out in line 12.
As mentioned, ProjectQ does not have its own dedicated quantum language. If one is using ProjectQ in conjunction with an IBM backend, the code will eventually get converted to Open-QASM, IBM’s quantum assembly language.
ProjectQ comes with a fast simulator written in C++, which will be installed by default unless an error occurs, in which case a slower Python simulator
will be installed.
Quantum Development Kit
Unlike the superconducting qubit technology of Rigetti Computing and IBM, Microsoft is betting highly on topological qubits based on Majorana fermions. These particles have recently been discovered and promise long coherence times and other desirable properties, but no functional quantum computer using topological qubits currently exists. As such, Microsoft currently has no device that users can connect to via their Quantum Development Kit (QDK), the youngest of the four platforms featured in this overview.
Nonetheless, the QDK features a new “quantum-focused” language called Q# that has strong integration with Visual Studio and Visual Studio Code and can simulate quantum circuits of up to 30 qubits locally.
Although it is listed as optional in the documentation, installing Visual Studio Code is strongly recommended for all platforms.Once this is done, the current version of the QDK can be installed by entering the following at a command line:
dotnet new -i "Microsoft.Quantum.ProjectTemplates::0.3.1810.2508-preview"
The online documentation contains information on validating a successful install, running a first quantum program, the quantum simulator, and the Q#
standard libraries and programming language. This documentation is verbose and contains a large amount of information.
The syntax of Q# is rather different from the previous three languages. It closely resembles C#, is more verbose than Python, and may have a steeper learning curve for those not familiar with C#.
Shown below is the same random number generator circuit that we have shown for all languages:
// random number generator circuit in QDK
operation random (count : Int, initial: Result) : (Int, Int)
{
  body
  {
      mutable numOnes = 0;
      using (qubits = Qubit[1])
      {
          for (test in 1..count)
         {
             Set(initial, qubits[0]);
             H(qubits[0]);
             let res = M(qubits[0]);
             // count the number of ones
             if (res == One)
             {
                 set numOnes = numOnes+1;
             }
         }
         Set(Zero, qubits[0]);
     }
     // return statistics
     return (count - numOnes, numOnes);
  }
}
As mentioned, the QDK has no current capability to connect to a real quantum computer, and it does not have a dedicated quantum assembly language. The Q# language can be considered a hybrid classical/quantum language, however.
On the users local computer, the QDK includes a quantum simulator that can run circuits of up to 30 qubits.
The kernels for QDK simulators were written by developers of ProjectQ, so performance can be expected to be similar to ProjectQ’s simulator
performance.
Through a paid subscription service to Azure cloud, one can get access to high performance computing that enables simulation ofmore than 40 qubits.
Conclusions
At this point, we hope that the reader has enough information and understanding to make an informed decision of what quantum software platform(s) is (are) right for him/her. A next step is to begin reading the documentation of a platform, install it, and begin coding. In a short amount of time one can begin running algorithms on real quantum devices and begin researching/developing algorithms in their respective field.
As a final tip, for those whose main objective is using quantum computers, Qiskit (or ProjectQ) or pyQuil is the obvious choice.
Join dotQuantum
Become Part Of The Future Quantum Bit World!!
By clicking on “SUBSCRIBE” you agree to receive our monthly newsletter (Read the Privacy Policy). You can unsubscribe at any time by clicking on the link in the newsletter that we will send you.